 |
Modified from a lesson prepared
by the SOHO Education and Outreach team
|
Materials
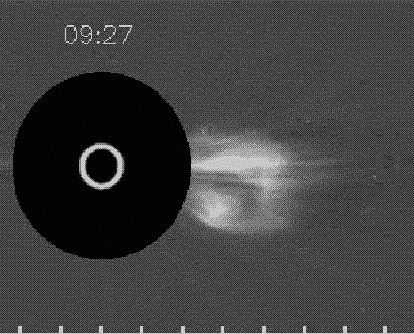
 At left is an image taken from one of the corona-graphs on LASCO. To the right of the disk we can see a CME erupting from the Sun.
The white circle shows the size and location of the Sun. The black disk is the occulting disk blocking out the disk of the Sun and the inner corona. The tick marks along the bottom of the image mark off units of the Sun's diameter.
Procedure
- Split into several groups of 4-5 persons each. Have each group independently select a feature that can be seen in all five images: for instance, the outermost extent of the bright structure or the inner edge of the dark loop shape.
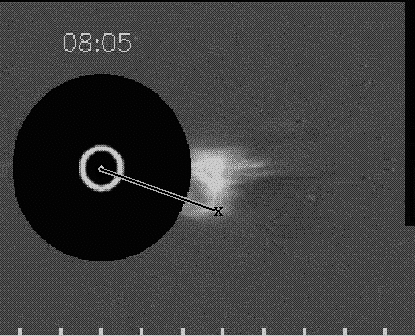
- You should end up with something like the following picture which represents the first image and your tracing paper overlay. X marks the location of an example feature.

- Measure position of the feature you have selected on the first image.
- The lengths of the lines you measured are only a few centimeters or tick marks long, depending on the size of image you used and the feature you selected. The Sun is, of course, much bigger than the picture you used to measure the distances recorded in Table 1.
To change these numbers to real distances from the Sun we have to know the scale of the Sun on the image. This is like looking at a map of your town where, quite often, the scale will be 1 inch to 1 mile or 2cm to 1 km.
In Column #4 of Table 1 you should have entered the length, in tick marks, for each of the lines you drew from sun-center to your selected feature. This provides the scale from the picture of the CME to the real thing.
Each tick mark corresponds to a distance equal to the diameter of the Sun, which is 1.4 million km.
- Multiply each of the numbers in Column #4 by 1,400,000 and enter the result next to it in Column #5.
You now have a complete set of times and real distances.
- The speed of an object, like a car or a CME, tells you how far it can travel in a given time. For instance, a car moving with a speed of 30 miles an hour travels 30 miles in 1 hour, 15 miles in half-an-hour, and 10 miles in 20 minutes (1/3 of an hour).
Column #2 of Table 1 gives the times in hours and minutes that the images were taken. In Column #2 of Table 2 we show the difference in time between two successive images (in hours).
- In Column #3 of Table 2 enter the difference in distances shown in Column #4 of Table 1.
- Finally, divide the number in Column #3 of Table 2 by the number in Column #2 and record the result in Column #4.
You now have a list of speeds for the CME at different times during its escape from the Sun.
Questions
- Are the CME speeds big or small?
- Is the CME faster or slower than a car?, a train?, an airplane?
- Were all the speeds you measured the same?
- If not, what do you think this means about the CME?
- Compare your results with the other groups. Did you all get roughly the same answers?
- If not, discuss the reasons why they were different?
Back to Wednesday's activities